March 8, 2012

iPhone SDK: Connect to Twitter with OAuth

This tutorial will show you how to quickly integrate the Twitter API with the iPhone SDK using Twitter-OAuth-iPhone, a plug-and-play Twitter library for the iPhone composed of multiple open-source projects combined and synthesized for ease of implementation by Ben Gottlieb.

NOTE: With the release of iOS 5, this article is now outdated. Moving forward, you should seriously consider using the Twitter Framework that ships with the iOS 5 SDK. Only consider implementing the solution demonstrated here if you must support users on older versions of iOS. A tutorial demonstrating the use of the Twitter Framework will be released on Mobiletuts+ in the coming weeks.

Project Setup

This tutorial will use a simple application called “TwitterRush” to demonstrate Twitter OAuth integration for the iPhone. By downloading the TwitterRush application, you will be able to precisely follow all steps in this tutorial. However, if you already have an iPhone project that you would like to connect with the Twitter API, you should still be able to follow along in your own code with only slight modifications.

In addition to TwitterRush or your own project, you will also need to download Ben Gottlieb’s Twitter-OAuth-iPhone project available on GitHub.

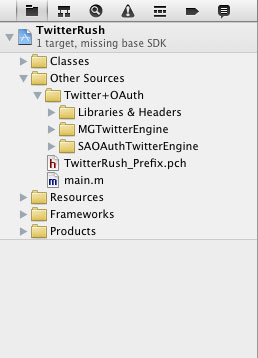
Step 1: Copy the Twitter+OAuth Folder

After downloading and unarchiving the Twitter-OAuth-iPhone library, drag the folder entitled “Twitter+OAuth” into the “Other Sources” folder in the Xcode 4 navigator area. Be sure to check the “Copy items into destination group’s folder (if needed)” option and click “Finish.”

Twitter API Guide 1

Trying to compile and run your application now will result in A LOT of errors (90 at the time of this writing with iOS SDK 4). Not to worry: we will easily fix all of them in Step 2.

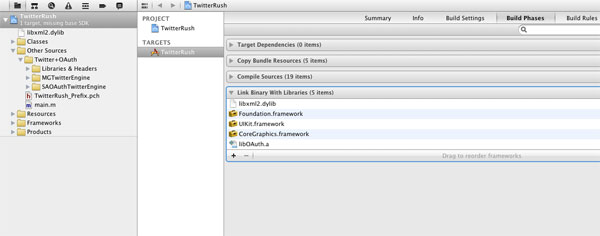
Step 2: Add the libxml2 Library

In the navigator area of Xcode 4, select the project name (in this case “TwitterRush”). Next, select the current target (“TwitterRush” here again), and then select the “Build Phases” tab. Expand the “Link Binary With Libraries” option, and then click the “+” button to add a new framework. Type “libxml2″ into the search box, and select the libxml2.dylib library that appears in the list. Click “Add” to include this library in the linking phase of your project.

After completing these steps, your screen should look something like this:

Adding the libxml2 library to an Xcode 4 project

After adding the library to your project, you will need to modify the “header search paths” setting in your project’s build settings. To do this, deselect the target and select the actual TwitterRush Project. Open the “Build Settings” tab and search for the “Header Search Paths” entry. Double click this setting and then click the “+” button in the bottom left of the pop-up dialogue to add a new search path. Click the “recursive” check box, double click the “Path” field, and enter the following dynamic path:

  1. $(SDKROOT)/usr/include/libxml2

After clicking “Done”, your screen should look similar to this:

Twitter API Guide 4

If you run the application from the Xcode menubar, you should now be able to build the application without any compile errors!

Step 3: Declare the NSXMLParserDelegate Protocol

While you are now able to compile and run the application without any errors, there are a number of warnings related to changes in the iOS4 SDK and the NSXMLParserDelegate protocol. You will need to explicitly declare that MGTwitterStatusesParser.h and MGTwitterXMLParser.h conform to this protocol in order to prevent these warnings from occurring.

To do so, open the MGTwitterStatusesParser.h file and modify the @interface declaration by declaring the NSXMLParserDelegate protocol like so:

  1. @interface MGTwitterStatusesParser : MGTwitterXMLParser {

Now do the same for MGTwitterXMLParser.h, modifying the @interface declaration to read:

  1. @interface MGTwitterXMLParser : NSObject {

You should now be able to smoothly compile the application without generating any errors or warnings! We’re now ready to begin integrating the Twitter-OAuth-iPhone library with our code.

Step 4: Import SA_OAuthTwitterController.h & Declare SA_OAuthTwitterEngine

We now need to begin importing the library classes that we will use to connect with the Twitter API. Open TwitterRushViewController.h and modify the code to read as follows:

  1. #import
  2. #import "SA_OAuthTwitterController.h"

  3. @class SA_OAuthTwitterEngine;

  4. @interface TwitterRushViewController : UIViewController
  5. {
  6. IBOutlet UITextField *tweetTextField;

  7. SA_OAuthTwitterEngine *_engine;
  8. }

  9. @property(nonatomic, retain) IBOutlet UITextField *tweetTextField;

  10. -(IBAction)updateTwitter:(id)sender;

  11. @end

On line 2, we import the SA_OAuthTwitterController class for use within our view controller. On line 4, we forward declare the SA_OAuthTwitterEngine class so we can declare an instance of that class in the @interface without actually importing the header file. On line 6 we declare the SA_OAuthTwitterControllerDelegate protocol -this will allow us to easily respond to Twitter API events later. Finally, on line 10 we declare the _engine object as an instance of the SA_OAuthTwitterEngine class.

Now switch to the TwitterRushViewController.m file. Import the SA_OAuthTwitterEngine class that we just forward declared in the class interface:

  1. #import "SA_OAuthTwitterEngine.h"

Because the SA_OAuthTwitterControllerDelegate only contains optional method declarations, at this point you should again be able to compile and run your application without any errors or warnings.

Step 5: Define Your Twitter API OAuth Credentials

In order to gain OAuth access to the Twitter API, you will need to first create a Consumer Key and a Secret Key for Twitter to be able to identify and authenticate your application. You can do this from the Twitter web site by logging into your account and navigating to the app registration form. When going through the registration process, be sure to specify “client” as the application type, check the “Yes, use Twitter for login” box, and select “Read & Write” as the default access type to enable your iPhone app to post tweets on behalf of your users.

After you have registered your application and Twitter has generated your application credentials, add the following to TwitterRushViewController.m above the class @implementation:

  1. #define kOAuthConsumerKey @"Your consumer key here" //REPLACE With Twitter App OAuth Key
  2. #define kOAuthConsumerSecret @"Your consumer secret here" //REPLACE With Twitter App OAuth Secret

We will use these constants momentarily when we instantiate our _engine object.

Step 6: Launch the Twitter Login Screen

For our use-case, we want to initialize the _engine object when our ViewController is created and then display the Twitter OAuth login screen as soon as the view controller finishes loading. To initialize the _engine object, modify the viewDidAppear method to read as follows:

  1. - (void)viewDidAppear: (BOOL)animated {

  2. if(!_engine){
  3. _engine = [[SA_OAuthTwitterEngine alloc] initOAuthWithDelegate:self];
  4. _engine.consumerKey = kOAuthConsumerKey;
  5. _engine.consumerSecret = kOAuthConsumerSecret;
  6. }

  7. }

Now go ahead and release the _engine object in our view controller’s dealloc method:

  1. - (void)dealloc {
  2. [_engine release];
  3. [tweetTextField release];
  4. [super dealloc];
  5. }

After our view finishes loading, we want to immediately launch the Twitter login screen. To do so, you will need to again modify the viewDidAppear method like so:

  1. - (void)viewDidAppear: (BOOL)animated {

  2. if(!_engine){
  3. _engine = [[SA_OAuthTwitterEngine alloc] initOAuthWithDelegate:self];
  4. _engine.consumerKey = kOAuthConsumerKey;
  5. _engine.consumerSecret = kOAuthConsumerSecret;
  6. }

  7. UIViewController *controller = [SA_OAuthTwitterController controllerToEnterCredentialsWithTwitterEngine:_engine delegate:self];

  8. if (controller){
  9. [self presentModalViewController: controller animated: YES];
  10. }

  11. }

If you run the application now, you’ll see that we are successfully presenting the Twitter login screen whenever our custom view is displayed. However, there is one major problem with this setup: the login screen will always be displayed when the view appears, even if the user has already logged in. We need to add a conditional that will only display this control if the user has not yet been connected via OAuth.

To do this, add the following conditional before displaying the view:

  1. if(![_engine isAuthorized]){
  2. UIViewController *controller = [SA_OAuthTwitterController controllerToEnterCredentialsWithTwitterEngine:_engine delegate:self];

  3. if (controller){
  4. [self presentModalViewController: controller animated: YES];
  5. }
  6. }

The isAuthorized method will return a boolean value of TRUE if we have an OAuth authentication token. So, this conditional simply tests whether we do not have authorization, and then displays the Twitter login when needed.

For the isAuthorized method to work, we also need to add the following SA_OAuthTwitterEngineDelegate protocol methods responsible for storing our OAuth authentication token after the first login:

  1. //=============================================================================================================================
  2. #pragma mark SA_OAuthTwitterEngineDelegate
  3. - (void) storeCachedTwitterOAuthData: (NSString *) data forUsername: (NSString *) username {
  4. NSUserDefaults *defaults = [NSUserDefaults standardUserDefaults];

  5. [defaults setObject: data forKey: @"authData"];
  6. [defaults synchronize];
  7. }

  8. - (NSString *) cachedTwitterOAuthDataForUsername: (NSString *) username {
  9. return [[NSUserDefaults standardUserDefaults] objectForKey: @"authData"];
  10. }

Step 7: Post Updates to Twitter

In what is perhaps the simplest step of the entire process, add the following single line of code to updateTwitter, our custom IBAction method, to actually post an update to Twitter:

  1. [_engine sendUpdate:tweetTextField.text];

Voila! You should now be posting updates to your Twitter feed. However, we aren’t quite finished yet. What happens if our application fails to post the update? What if we wanted to present a confirmation view if the tweet is posted successfully? Thankfully, the TwitterEngineDelegate protocol has two methods defined for just this purpose.

Add the following code to TwitterRushViewController.m:

  1. //=============================================================================================================================
  2. #pragma mark TwitterEngineDelegate
  3. - (void) requestSucceeded: (NSString *) requestIdentifier {
  4. NSLog(@"Request %@ succeeded", requestIdentifier);
  5. }

  6. - (void) requestFailed: (NSString *) requestIdentifier withError: (NSError *) error {
  7. NSLog(@"Request %@ failed with error: %@", requestIdentifier, error);
  8. }

You can see that the application will now log success and failure messages to the console depending on what happens after we click the “Tweet” button. This behavior can be easily modified to match the needs of your own apps.

Conclusion

If you have followed the step-by-step instructions above, you should now be able to post status updates to Twitter on behalf of your users!

The full TwitterRushViewController.h file should now look like this:

  1. #import
  2. #import "SA_OAuthTwitterController.h"

  3. @class SA_OAuthTwitterEngine;

  4. @interface TwitterRushViewController : UIViewController
  5. {

  6. IBOutlet UITextField *tweetTextField;

  7. SA_OAuthTwitterEngine *_engine;

  8. }

  9. @property(nonatomic, retain) IBOutlet UITextField *tweetTextField;

  10. -(IBAction)updateTwitter:(id)sender;

  11. @end

The full TwitterRushViewController.m file should read:

  1. #import "TwitterRushViewController.h"
  2. #import "SA_OAuthTwitterEngine.h"

  3. /* Define the constants below with the Twitter
  4. Key and Secret for your application. Create
  5. Twitter OAuth credentials by registering your
  6. application as an OAuth Client here: http://twitter.com/apps/new
  7. */

  8. #define kOAuthConsumerKey @"Your Key Here" //REPLACE With Twitter App OAuth Key
  9. #define kOAuthConsumerSecret @"Your Secret Here" //REPLACE With Twitter App OAuth Secret

  10. @implementation TwitterRushViewController

  11. @synthesize tweetTextField;

  12. #pragma mark Custom Methods

  13. -(IBAction)updateTwitter:(id)sender
  14. {
  15. //Dismiss Keyboard
  16. [tweetTextField resignFirstResponder];

  17. //Twitter Integration Code Goes Here
  18. [_engine sendUpdate:tweetTextField.text];
  19. }

  20. #pragma mark ViewController Lifecycle

  21. - (void)viewDidAppear: (BOOL)animated {

  22. // Twitter Initialization / Login Code Goes Here
  23. if(!_engine){
  24. _engine = [[SA_OAuthTwitterEngine alloc] initOAuthWithDelegate:self];
  25. _engine.consumerKey = kOAuthConsumerKey;
  26. _engine.consumerSecret = kOAuthConsumerSecret;
  27. }

  28. if(![_engine isAuthorized]){
  29. UIViewController *controller = [SA_OAuthTwitterController controllerToEnterCredentialsWithTwitterEngine:_engine delegate:self];

  30. if (controller){
  31. [self presentModalViewController: controller animated: YES];
  32. }
  33. }

  34. }

  35. - (void)viewDidUnload {
  36. [tweetTextField release];
  37. tweetTextField = nil;
  38. }

  39. - (void)didReceiveMemoryWarning {
  40. [super didReceiveMemoryWarning];
  41. }

  42. - (void)dealloc {
  43. [_engine release];
  44. [tweetTextField release];
  45. [super dealloc];
  46. }

  47. //=============================================================================================================================
  48. #pragma mark SA_OAuthTwitterEngineDelegate
  49. - (void) storeCachedTwitterOAuthData: (NSString *) data forUsername: (NSString *) username {
  50. NSUserDefaults *defaults = [NSUserDefaults standardUserDefaults];

  51. [defaults setObject: data forKey: @"authData"];
  52. [defaults synchronize];
  53. }

  54. - (NSString *) cachedTwitterOAuthDataForUsername: (NSString *) username {
  55. return [[NSUserDefaults standardUserDefaults] objectForKey: @"authData"];
  56. }

  57. //=============================================================================================================================
  58. #pragma mark TwitterEngineDelegate
  59. - (void) requestSucceeded: (NSString *) requestIdentifier {
  60. NSLog(@"Request %@ succeeded", requestIdentifier);
  61. }

  62. - (void) requestFailed: (NSString *) requestIdentifier withError: (NSError *) error {
  63. NSLog(@"Request %@ failed with error: %@", requestIdentifier, error);
  64. }
  65. @end

Thanks for reading this tutorial on the Twitter-OAuth-iPhone library, and a very special thanks to Ben Gottlieb, Matt Gemmell, Jon Crosby, Chris Kimpton, and Isaiah Carew. Without their hard work, implementing the Twitter API with the iPhone SDK would take many, many more steps to achieve.

Source: http://mobile.tutsplus.com/tutorials/iphone/twitter-api-iphone/

Read more

February 24, 2012

How to Handle Device Rotation for UIViews in iOS

Choosing to support orientation changes in a UIViewController is a simple process in iOS. Apple has already provided the methods to attach to. Supporting orientation changes in a UIView is easy, though it is less robust. When listening for orientation changes, the view can respond visually to the rotation of the device. These notifications will also notify when the device is screen-side down or screen-side up.

Illustration of an iPhone rotating in space to show device orientation with a green arrow and a crazy photo of me in the February 2011 Chicago blizzard as the wallpaper

Requesting Notifications for Orientation Changes

Code to support orientation changes can be added at any time throughout the life of a view. The code to start listening for notifications of orientation changes is:

[[UIDevice currentDevice] beginGeneratingDeviceOrientationNotifications];
[[NSNotificationCenter defaultCenter] addObserver: self selector:@selector(deviceOrientationDidChange:) name: UIDeviceOrientationDidChangeNotification object:nil];

UIDevice according to the Apple documentation is “a singleton instance representing the current device.” Calling the class method1beginGeneratingDeviceOrientationNotifications tells the device to fire up the accelerometer to start sending out orientation change notifications. However that one line alone will not respond to the notifications. The second line will and adds the view (self) as an observer to the main notification center. It will then start receiving notifications of type UIDeviceOrientationDidChangeNotification. Each time the orientation changes the method, via @selector, will call our custom method deviceOrientationDidChange:. The colon representing a parameter will be a variable of type NSNotification.

Responding to Device Rotation

Using the code above, the view is ready to respond with the following method.

UIDeviceOrientation currentOrientation;

- (void)deviceOrientationDidChange:(NSNotification *)notification {
//Obtaining the current device orientation
UIDeviceOrientation orientation = [[UIDevice currentDevice] orientation];

//Ignoring specific orientations
if (orientation == UIDeviceOrientationFaceUp || orientation == UIDeviceOrientationFaceDown || orientation == UIDeviceOrientationUnknown || currentOrientation == orientation) {
return;
}
[NSObject cancelPreviousPerformRequestsWithTarget:self selector:@selector(relayoutLayers)object:nil];
//Responding only to changes in landscape or portrait
currentOrientation = orientation;
//
[self performSelector:@selector(orientationChangedMethod) withObject:nil afterDelay:0];
}

The first line sets up currentOrientation to hold the last orientation. A lot of data comes through and the slightest movement can trigger another notification. So to prevent unnecessary reaction, the last orientation is stored.

The method is the one mentioned above and takes the parameter of the typeNSNotification. Then the current device orientation is stored in a local variable.

Using orientation, specific orientations are ignored. I only want the app to respond to rotation changes from portrait to landscape. So we check to make sure the orientation is not changing to face up or face down. The device can have issues determining the orientation. This is why it will also ignore the unknown (UIDeviceOrientationUnknown) notification. Finally, if the last orientation was the same (to avoid unnecessary rotation code execution); ignored.

Now that the orientation is not face up, face down, unknown, or the same as the last event, the currentOrientation variable is set. The last line of the method performs a @selector. This will call another method with optional parameters after a specified amount of time. This is necessary because any changes based on the bounds of the view (self) will not be updated by the time this method has been called.

Extra Orientation Notes

After implementing the code above in my own view, there were times when the device rotated 180 degrees so the orientation change was handled by the parentUIViewController. Therefore the updates I was doing in myorientationChangedMethod were unnecessary. The following code was added to check for similar orientations and return if no change was needed.

if ((UIDeviceOrientationIsPortrait(currentOrientation) &&UIDeviceOrientationIsPortrait(orientation)) ||
(UIDeviceOrientationIsLandscape(currentOrientation) &&UIDeviceOrientationIsLandscape(orientation))) {
//still saving the current orientation
currentOrientation = orientation;
return;
}

If the view implementing this code requires actions based on an orientation, it is recommended to base it on the default orientation UIDeviceOrientationPortrait orUIDeviceOrientationLandscape, based on the need for your app. Otherwise the default value for [[UIDevice currentDevice] orientation] isUIDeviceOrientationUnknown and can lead to unexpected results if code depends on this orientation being correct.


source from http://the.ichibod.com/kiji/how-to-handle-device-rotation-for-uiviews-in-ios/

Read more

June 28, 2011

Phần mềm xem lịch phát sóng các kênh truyền hình Việt Nam trên Android

Thông tin từ nhà phát triển:
tvonhand là một ứng dụng miễn phí cho Android OS. Với tvonhand, bạn sẽ có lịch phát sóng của hầu hết các đài truyền hình ở Việt Nam, bao gồm các đài thông dụng cũng như truyền hình cáp (SCTV cáp, HTVC cáp, Hà Nội cáp…). tvonhand là một trong những lịch phát sóng điện tử tốt nhất hiện nay trên android.

tvonhand hổ trợ 2 ngôn ngữ là tiếng Anh và tiếng Việt (mặc định) với giao diện người dùng thân thiện. Người sử dụng có thể xem danh sách các chương trình đang phát sóng ở tất cả các kênh, hay có thể xem chương trình của từng kênh trong một ngày.

Chức năng hẹn giờ cho phép hẹn giờ cho bất cứ chương trình nào bạn thích và ứng dụng sẽ thông báo khi đến giờ phát sóng.

Ngoài ra bạn cũng có thể chia sẽ chương trình yêu thích cho bạn bè, gia đình thông qua facebook, twitter, mail hay bất cứ mạng xã hội nào có cài trên chiếc phone android của bạn.

tvonhand hoạt động tốt trên android phiên bản 1.6 trở lên.

Sau đây là danh sách gần 50 kênh hiện tại đang có trên tvonhand. Chúng tôi vẫn đang phát triển thêm nhiều kênh nữa. Khi có kênh mới thì ứng dụng tự động cập nhật mà không cần tới bất cứ thao tác update nào của bạn.

VTV 1, VTV 2, VTV 3, VTV 4, VTV 6, VTV 9, THVL 1, THVL 2, HTVC CANHAC, HTVC GIADINH, PHUNU, DULICH, HTVC PHIM, THUAN VIET, FASHION TV, MTV, HTV 7, HTV 9, SCTV 1, SCTV 7, SCTV 9, SCTV 14, SCTV 15, SCTV 16, SCTV 17, MAX, VCTV 1, VCTV 2, VCTV 3, VCTV 4, VCTV 6, VCTV 7, VCTV 8, Cinemax, HBO, ESPN, Channel, Star Movies, Star Sports, The thao TV, Discovery, Bong Da TV, Cartoon, Astro Cam Xuc, Invest TV, O2 TV, Style TV….

Ứng dụng vẫn đang được phát triển thêm với nhiều tính năng thú vị. Bất cứ thay đổi nào bạn sẽ là người được thông báo sớm nhất.

* Hiện tại chương trình này đang được chuyển sang iphone, và windowphone. Huy vọng sẽ sớm ra mắt trong thời gian sắp tới.

Download:
- Máy bạn nào có market thì vào market và search "tvonhand" là ra ngay.
- Máy bạn nào không có market thì download tại đây
- Thông tin chi tiết về chương trình các bạn xem tại đây: http://tvonhand.techpropulsionlabs.com
Read more

June 23, 2011

How to save java object in database

Java object can be saved in any database after serialization of objects. To serialization of object you need to implement, serializable interface java.io.Serializable in class.Object first need to convert into binary stream and after this, binary stream can store in database with blob data type.

Blob data type in database save data as binary content. This content can be fetched and again typecast into original class object.

We are using MySql database to store java object. In JDBC, we are using setObject function to insert object in database. setObject is function of preparedstatement.

Database table

CREATE TABLE `javaobject` (
`id` int(10) unsigned NOT NULL AUTO_INCREMENT,
`javaObject` longblob,
PRIMARY KEY (`id`)
)

Where from we call and set object

MyClass mc=new MyClass();
mc.setSName("This is setting object");

SaveObject so=new SaveObject();

try{
so.setJavaObject(mc);
so.saveObject();

}
catch(Exception e)
{
e.printStackTrace();
}

MyClass.java

import java.io.Serializable;

public class MyClass implements Serializable{

public String sName=null;

public String getSName() {
return sName;
}

public void setSName(String name) {
sName = name;
}

}

Saving object in database

SaveObject.java

import java.io.ByteArrayInputStream;
import java.io.ByteArrayOutputStream;
import java.io.ObjectInputStream;
import java.io.ObjectOutputStream;
import java.sql.Connection;
import java.sql.PreparedStatement;
import java.sql.ResultSet;

public class SaveObject {

public Object javaObject=null;

public Object getJavaObject() {
return javaObject;
}

public void setJavaObject(Object javaObject) {
this.javaObject = javaObject;
}

public void saveObject() throws Exception
{
try{
Connection conn=/// get connection string;
PreparedStatement ps=null;
String sql=null;

ByteArrayOutputStream bos = new ByteArrayOutputStream();
ObjectOutputStream oos = new ObjectOutputStream(bos);

oos.writeObject(javaObject);
oos.flush();
oos.close();
bos.close();

byte[] data = bos.toByteArray();

sql="insert into javaobject (javaObject) values(?)";
ps=conn.prepareStatement(sql);
ps.setObject(1, data);
ps.executeUpdate();

}
catch(Exception e)
{
e.printStackTrace();
}

}

public Object getObject() throws Exception
{
Object rmObj=null;
Connection conn=/// get connection string;
PreparedStatement ps=null;
ResultSet rs=null;
String sql=null;

sql="select * from javaobject where id=1";

ps=conn.prepareStatement(sql);

rs=ps.executeQuery();

if(rs.next())
{
ByteArrayInputStream bais;

ObjectInputStream ins;

try {

bais = new ByteArrayInputStream(rs.getBytes("javaObject"));

ins = new ObjectInputStream(bais);

MyClass mc =(MyClass)ins.readObject();

System.out.println("Object in value ::"+mc.getSName());
ins.close();

}
catch (Exception e) {

e.printStackTrace();
}

}

return rmObj;
}
}

get Object from database

try{
SaveObject so=new SaveObject();
so.getObject();
}
catch(Exception e)
{
e.printStackTrace();
}

Read more

May 24, 2011

How to export plain text to UTF-8

I explain about how to determine text file encoding:
File contains data: Hello

48 65 6C 6C 6F

This is the traditional ANSI encoding.

48 00 65 00 6C 00 6C 00 6F 00

This is the Unicode (little-endian) encoding with no BOM.

FF FE 48 00 65 00 6C 00 6C 00 6F 00

This is the Unicode (little-endian) encoding with BOM. The BOM (FF FE) serves two purposes: First, it tags the file as a Unicode document, and second, the order in which the two bytes appear indicate that the file is little-endian.

00 48 00 65 00 6C 00 6C 00 6F

This is the Unicode (big-endian) encoding with no BOM. Notepad does not support this encoding.

FE FF 00 48 00 65 00 6C 00 6C 00 6F

This is the Unicode (big-endian) encoding with BOM. Notice that this BOM is in the opposite order from the little-endian BOM.

EF BB BF 48 65 6C 6C 6F

This is UTF-8 encoding. The first three bytes are the UTF-8 encoding of the BOM.

2B 2F 76 38 2D 48 65 6C 6C 6F

This is UTF-7 encoding


Here is a test example code:
---------------------
FileInputStream fileStream = new FileInputStream( "d:\\4.txt" );
byte[] arr = new byte[]{1,2,3};
fileStream.read(arr);
System.out.println(arr[0]);
System.out.println(arr[1]);
System.out.println(arr[2]);

System.out.println("...................");
System.out.println("utf-8:" + (byte)0xEF + " - " + (byte)0xBB + " - " + (byte)0xBF);//EF BB BF
System.out.println("big-endian: " + (byte)0xFE + " - " + (byte)0xFF);//FE FF
System.out.println("little-endian: " + (byte)0xFF + " - " + (byte)0xFE); //FF FE
Read more

February 24, 2011

Copy image to clipboard in java

Here is code example:

/**
* Transferable used to communicate with the system clipboard.
*/

static class ImageTransferable implements Transferable, ClipboardOwner
{
Image image;
ImageTransferable(Image img)
{
this.image = img;
}
public DataFlavor[] getTransferDataFlavors()
{
return new DataFlavor[]{DataFlavor.imageFlavor};
}
public boolean isDataFlavorSupported(DataFlavor flavor)
{
return DataFlavor.imageFlavor.equals(flavor);
}
public Object getTransferData(DataFlavor flavor) throws UnsupportedFlavorException, IOException
{
return image;
}
//empty ClipBoardOwner implementation
public void lostOwnership(Clipboard clipboard, Transferable contents) {}
}

//=====================================================
public void copyImageToClipboard(BufferedImage image){
ImageTransferable it = new ImageTransferable(image);
Clipboard clip=Toolkit.getDefaultToolkit().getSystemClipboard();
clip.setContents(it,it);
}
Read more

August 21, 2010

Get keyboard hook and mouse hook in C#

Code demo:
using System;
using System.Diagnostics;
using System.Windows.Forms;
using System.Runtime.InteropServices;

namespace TestHook
{
class KeyboardAndMouseHook
{
private const int WH_KEYBOARD_LL = 13;
private const int WM_KEYDOWN = 0x0100;
private static LowLevelMouseProc _procMouse = HookCallbackMouse;
private static LowLevelKeyboardProc _procKey = HookCallbackKey;
private static IntPtr _hookIDMouse = IntPtr.Zero;
private static IntPtr _hookIDKey = IntPtr.Zero;

public static void Main()
{
_hookIDMouse = SetHook(_procMouse);
_hookIDKey = SetHook(_procKey);

Application.Run();

UnhookWindowsHookEx(_hookIDMouse);
UnhookWindowsHookEx(_hookIDKey);
}

//===============================================================================================================
//Import library

[DllImport("user32.dll", CharSet = CharSet.Auto, SetLastError = true)]
[return: MarshalAs(UnmanagedType.Bool)]
private static extern bool UnhookWindowsHookEx(IntPtr hhk);

[DllImport("user32.dll", CharSet = CharSet.Auto, SetLastError = true)]
private static extern IntPtr CallNextHookEx(IntPtr hhk, int nCode,
IntPtr wParam, IntPtr lParam);

[DllImport("kernel32.dll", CharSet = CharSet.Auto, SetLastError = true)]
private static extern IntPtr GetModuleHandle(string lpModuleName);


//taluan
//================================================================================================================
//keyboard hook

private static IntPtr SetHook(LowLevelKeyboardProc proc)
{
using (Process curProcess = Process.GetCurrentProcess())
using (ProcessModule curModule = curProcess.MainModule)
{
return SetWindowsHookEx(WH_KEYBOARD_LL, proc,
GetModuleHandle(curModule.ModuleName), 0);
}
}

private delegate IntPtr LowLevelKeyboardProc(
int nCode, IntPtr wParam, IntPtr lParam);

private static IntPtr HookCallbackKey(
int nCode, IntPtr wParam, IntPtr lParam)
{
if (nCode >= 0 && wParam == (IntPtr)WM_KEYDOWN)
{
int vkCode = Marshal.ReadInt32(lParam);
Console.WriteLine("key: " + (Keys)vkCode);
}

return CallNextHookEx(_hookIDKey, nCode, wParam, lParam);
}

[DllImport("user32.dll", CharSet = CharSet.Auto, SetLastError = true)]
private static extern IntPtr SetWindowsHookEx(int idHook,
LowLevelKeyboardProc lpfn, IntPtr hMod, uint dwThreadId);


//taluan
//================================================================================================================
//Mouse hook

private static IntPtr SetHook(LowLevelMouseProc proc)
{
using (Process curProcess = Process.GetCurrentProcess())
using (ProcessModule curModule = curProcess.MainModule)
{
return SetWindowsHookEx(WH_MOUSE_LL, proc,
GetModuleHandle(curModule.ModuleName), 0);
}
}

private delegate IntPtr LowLevelMouseProc(int nCode, IntPtr wParam, IntPtr lParam);

private static IntPtr HookCallbackMouse(int nCode, IntPtr wParam, IntPtr lParam)
{
if (nCode >= 0 && MouseMessages.WM_LBUTTONDOWN == (MouseMessages)wParam)
{
MSLLHOOKSTRUCT hookStruct = (MSLLHOOKSTRUCT)Marshal.PtrToStructure(lParam, typeof(MSLLHOOKSTRUCT));
Console.WriteLine("mouse: " + hookStruct.pt.x + ", " + hookStruct.pt.y);
}
return CallNextHookEx(_hookIDMouse, nCode, wParam, lParam);
}


private const int WH_MOUSE_LL = 14;

private enum MouseMessages
{
WM_LBUTTONDOWN = 0x0201,
WM_LBUTTONUP = 0x0202,
WM_MOUSEMOVE = 0x0200,
WM_MOUSEWHEEL = 0x020A,
WM_RBUTTONDOWN = 0x0204,
WM_RBUTTONUP = 0x0205
}

[StructLayout(LayoutKind.Sequential)]
private struct POINT
{
public int x;
public int y;
}

[StructLayout(LayoutKind.Sequential)]
private struct MSLLHOOKSTRUCT
{
public POINT pt;
public uint mouseData;
public uint flags;
public uint time;
public IntPtr dwExtraInfo;
}

[DllImport("user32.dll", CharSet = CharSet.Auto, SetLastError = true)]
private static extern IntPtr SetWindowsHookEx(int idHook,
LowLevelMouseProc lpfn, IntPtr hMod, uint dwThreadId);

}
}
Read more

May 29, 2010

Read file with multiple encoding

This code read file with encoding (Utf-8, Utf-16 and ANSI)

BufferedReader br = null;
try {
FileInputStream fileStream = new FileInputStream(path);
byte[] arr = new byte[]{1,2,3};
fileStream.read(arr);
if(arr[0]==-1){
br = new BufferedReader(
new InputStreamReader(
new FileInputStream(path, "UTF-16"));
}else if(arr[0]==-17){
br = new BufferedReader(
new InputStreamReader(
new FileInputStream(path, "UTF-8"));
}else{
br = new BufferedReader(
new InputStreamReader(
new FileInputStream(path));
}
} catch (Exception e) {
e.printStackTrace();
}
Read more

May 7, 2010

Send email in java

Với gói javamail của sun, việc gửi mail của bạn trở nên cực kỳ dễ dàng. Sau đây là 1 chương trình gửi mail hoàn chỉnh với tài khoản gmail và được validate ngon lành. Bạn copy đoạn code sau đó dùng notepad tạo file SendMailOK.java, paste đoạn code vào, lưu lại

Bạn phải download gói java mail của sun, cài đặt và thiết lập classpath đến file mail.jar trước khi thực thi ứng dụng.
http://java.sun.com/products/javamail/downloads/index.html
Ngoài ra, bạn còn phải thiết lập classpath đến 2 gói activation.jar và javaee.jar (2 gói này nằm trong glassfish\lib folder nếu dùng Glassfish)

Để thực thi, chạy command line, gõ java SendMailOK.java để biên dịch, sau đó gõ javac SendMailOK để chạy.

package src.com.digitexx.email;

import java.util.Date;
import java.util.Properties;

import javax.mail.Authenticator;
import javax.mail.Message;
import javax.mail.PasswordAuthentication;
import javax.mail.Session;
import javax.mail.Transport;
import javax.mail.internet.InternetAddress;
import javax.mail.internet.MimeMessage;

public class SendGmail {

public static void send(String smtpServer, String to, String from,
String psw, String subject, String body) throws Exception {
// java.security.Security.addProvider(new
// com.sun.net.ssl.internal.ssl.Provider());
Properties props = System.getProperties();
// –
props.put("mail.smtp.host", smtpServer);
props.put("mail.smtp.port", 587);
props.put("mail.smtp.starttls.enable", "true");
final String login = from;// "nth001@gmail.com";//usermail
final String pwd = psw;// "password cua ban o day";
Authenticator pa = null; // default: no authentication
if (login != null && pwd != null) { // authentication required?
props.put("mail.smtp.auth", "true");
pa = new Authenticator() {
public PasswordAuthentication getPasswordAuthentication() {
return new PasswordAuthentication(login, pwd);
}
};
}// else: no authentication
Session session = Session.getInstance(props, pa);
// — Create a new message –
Message msg = new MimeMessage(session);
// — Set the FROM and TO fields –
msg.setFrom(new InternetAddress(from));
msg.setRecipients(Message.RecipientType.TO, InternetAddress.parse(to, false));

// — Set the subject and body text –
msg.setSubject(subject);
msg.setText(body);
// — Set some other header information –
msg.setHeader("X-Mailer", "LOTONtechEmail");
msg.setSentDate(new Date());
msg.saveChanges();
// — Send the message –
Transport.send(msg);
System.out.println("Message sent OK.");

}

/**
* Main method to send a message given on the command line.
*/
public static void main(String[] args) {
{
try {
String smtpServer = "smtp.gmail.com";
// String smtpServer = "digi-texx.com.vn";
String from = "anhchangsitinh19862001@gmail.com";
String to = "taluan@digi-texx.com.vn";
String subject = "Hello from Java";
String body = "Test using java to send mail.";
String password = "password";
send(smtpServer, to, from, password, subject, body);
System.out.println("Finish!");
} catch (Exception ex) {
System.out.println("Usage: " + ex.getMessage());
}

}

/**
* "send" method to send the message.
*/

}
}

Read more

Recent Comments

Xã hội - VnExpress.net